Building a Private AI Assistant with OpenClaw
Introduction
Most AI assistants are locked inside a browser tab or a specific app. They don't have access to your daily communication channels, or worse, they send your data to a black box where you have no control over how it's used.
The solution is to run your own agent. OpenClaw (formerly known as ClawdBot and Moltbot) is a local first AI agent that you control. It bridges the gap between powerful LLMs and the messaging apps you use every day. Unlike standard chatbots that reset every session, OpenClaw maintains a persistent memory of your life and work context.
The goal of this guide is to set up an agent that listens on Telegram, runs on a VPS you own, and can perform tasks for you 24/7.
Security Alert: Critical Update (Feb 2026)
Advisory: GHSA-g8p2-7wf7-98mq
Impact: 1-Click Remote Code Execution (RCE) via Authentication Token Exfiltration.
Status: Patched in v2026.1.29.
If you installed OpenClaw before February 2026, you are likely vulnerable. The vulnerability allows an attacker to compromise your gateway via a crafted link.
Action Required: Ensure you are running version v2026.1.29 or later. If you are installing fresh using the methods in this guide (referencing the main branch), you will automatically get the latest patched version.
What is OpenClaw?
OpenClaw is an open source project designed to give you a personal AI assistant that lives on your own infrastructure. It started as ClawdBot in late 2025, was briefly renamed to Moltbot due to a trademark request from Anthropic, and is now known as OpenClaw.
Despite the name changes, the core philosophy has remained the same:
- Privacy: The agent runs where you put it. Your conversation history stays on your server, not on someone else's cloud.
- Connectivity: It connects to the platforms you actually use. Instead of opening a dedicated "AI app," you just text your agent on WhatsApp or Telegram like you would a friend.
- Extensibility: It isn't just a chatbot. Through "skills" and "hooks," OpenClaw can execute code, search the web, or interact with other APIs, effectively turning talk into action.
Prerequisites
To get started, you will need a few things:
- A VPS (Virtual Private Server): You need a server running 24/7.
- Recommendation: 4GB RAM Minimum. Do not try to run this on a 1GB instance (see below).
- Providers: DigitalOcean (Basic Droplet) or Hetzner Cloud are solid choices.
- API Keys:
- LLM Provider: An API Key from Anthropic (Claude), OpenAI (GPT-4), or Google Gemini (CLI OAuth).
- Telegram: A Bot Token from @BotFather.
Server Setup (The Journey)
My goal was to optimize for the smallest possible footprint—mostly to see if I could run a competent agent on the 'coffee money' tier of cloud hosting. Why pay for expensive compute if the agent stays idle most of the day? However, I learned the hard way that "minimum specs" exist for a reason.
Testing with 1GB RAM
I started with a standard, entry-level DigitalOcean Droplet (1GB RAM, 1 CPU). It's the default choice for hobby projects and usually handles lightweight web servers without breaking a sweat, so I figured a Node.js app wouldn't be much different. I tried the standard "quick start" command:
curl -fsSL https://openclaw.ai/install.sh | bash
Result: Complete silence. The script would start, hang for a few minutes, and then exit without printing a single line of output or error log. It was a black box failure.
Modern AI agents are heavy. Between the Node.js runtime and the buffers required for processing messages, 1GB simply wasn't enough to even start the application.
The Docker Route (1GB RAM)
Thinking the issue might be environmental, I tried to containerize the problem on the same 1GB server. I wrote a custom setup-docker.sh script to set up a 2GB swap file (essentially using disk space as slow RAM) and build the image inside Docker.
Result: Failure during the build step. Even with swap enabled, the process crashed with: FATAL ERROR: Reached heap limit Allocation failed - JavaScript heap out of memory. The build process inside the container spiked memory usage well above the limit, causing the OOM killer to terminate the process.
Success... Mostly (4GB RAM)
I finally bit the bullet and upgraded to a 4GB RAM VPS (Basic Droplet, ~ $24/mo).
Instead of Docker, I used a "bare metal" setup script (setup.sh) that runs directly on the OS. This approach removes the overhead of the container runtime. The script handles the tedious parts:
- System Setup: Creates a dedicated
openclawuser and 2GB swap file. - Dependencies: Installs Node.js 22 and
pnpm. - Service: Creates a
systemdservice so the bot starts automatically on reboot. - CLI: Creates a global
openclawalias for easy management.

I was able to get it running on the 4GB VPS after a few attempts and adjustments to the setup script. I have provided both scripts below so you can take a look:
setup.sh(Bare Metal)setup-docker.sh(Docker)
# Verify the service is running
sudo systemctl status openclaw
Moving to Hetzner
Technically, yes, 4GB works. The bot runs. I've been using it for a couple of days now, but I've noticed it can be sluggish. Sometimes responses hang for a split second longer than I'd like.
My hunch is that 4GB is practically the bare minimum. Between the OS overhead, the Node.js runtime, and the vector database operations, the server is likely dipping into swap space, causing those micro-stutters.
The Fix: I'm already provisioning an 8GB VPS on Hetzner. For roughly the same price as the DigitalOcean droplet, I can get double the RAM and better CPU performance. If you're serious about this, skip the 4GB tier and go straight for 8GB or host it on a dedicated machine.
Configuration
Once the service is running (wherever you host it), the next step is to actually connect it to the world.
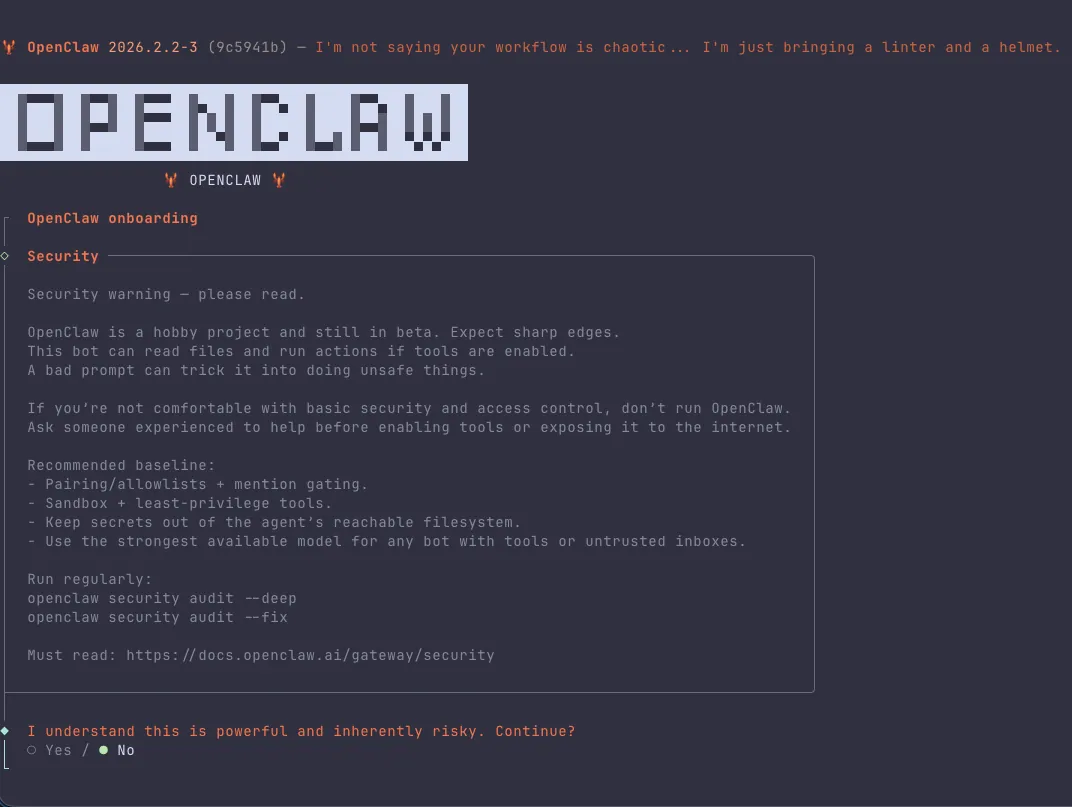
OpenClaw includes a CLI wizard for this. SSH into your server and run:
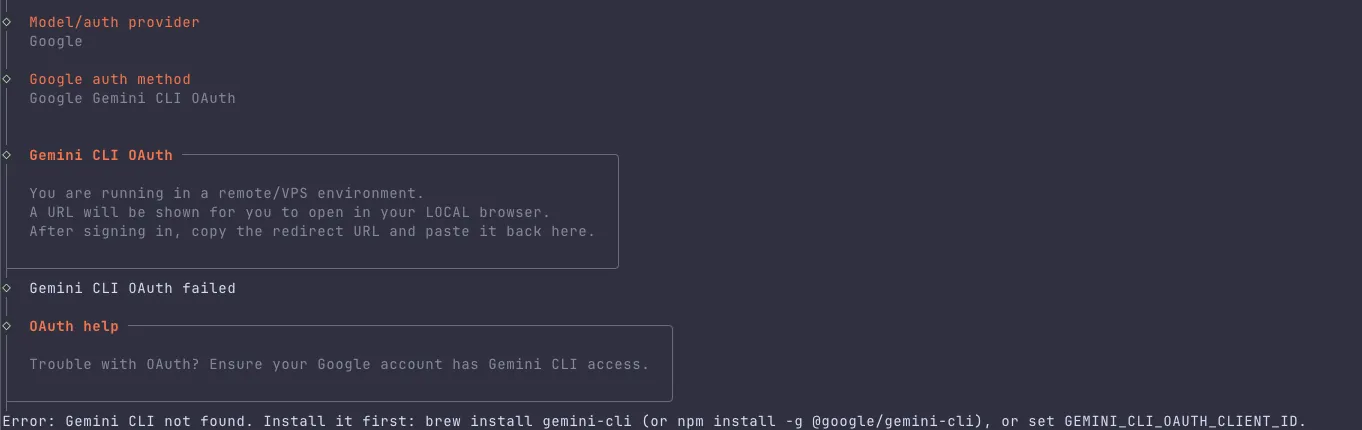
If you plan to use Google Gemini, you need to install the authentication CLI first to avoid errors:
npm install -g @google/gemini-cli
Then, run the onboarding wizard:
openclaw onboard
This interactive wizard will walk you through setting up your LLM Provider (Anthropic sk-ant..., OpenAI sk-proj..., or Google Gemini).

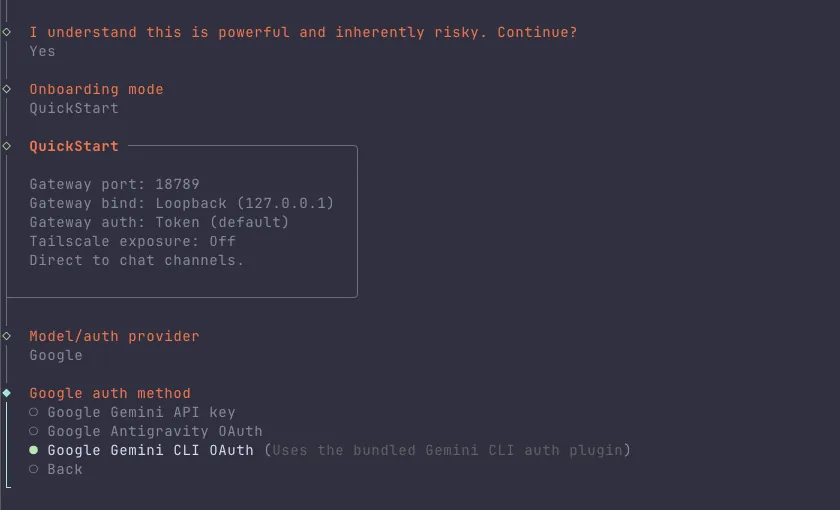
Note on Gemini Auth: If you choose Gemini, the CLI will output a URL.
- Open that URL in your local browser.
- Complete the Google Sign-In flow.
- The browser will eventually redirect to a
localhostURL that fails to load. This is normal. - Copy that entire
http://localhost:port/?code=...URL and paste it back into your terminal.
Is this a security issue? No. You are simply manually passing the authentication code back to the application because your remote server cannot open a local browser window to capture it automatically.
Connecting the Chat Interface
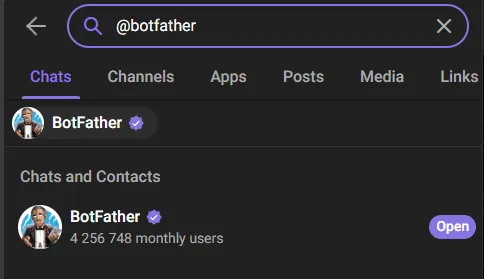
The openclaw onboard command above asks for a Telegram Bot Token, but where do you get one?
-
Telegram (Recommended):
- Open Telegram and search for @BotFather.
- Send the command
/newbot. - Follow the prompts to name your bot.
- Copy the HTTP API Token it gives you and paste it into the wizard.
-
WhatsApp:
- OpenClaw supports WhatsApp via the Meta Business API, but it is significantly harder to set up (requires a verified Business Manager account). For a personal assistant, I highly recommend sticking to Telegram.
After the configuration is complete, restart the service to apply the changes:
sudo systemctl restart openclaw
Testing & Pairing the Agent
Open Telegram and message your bot. It won't chat with you immediately—it needs to trust you first.
- Find your bot: Search for your bot's username on Telegram.
- Send a generic message: Say "Hello".
- Receive Code: The bot will reply with a 6-digit pairing code.
- Approve: Paste this code into your running terminal to authorize your account.
Is Pairing Safe?
Yes. It ensures that even if a stranger finds your bot, they can't use it unless they also have SSH access to your server to approve the pairing request.
- Pairing Mode (Default): Anyone can message the bot, but it only responds with a code until approved.
- Allowlist Mode (Safest): Once you are paired, you can lock the bot down to only respond to your specific User ID, making it invisible to everyone else.
Adding Skills (Optional)
The "magic" of OpenClaw isn't just chatting; it's doing. You can enable skills (plugins) to give your agent access to more tools.
For example, to enable Google Search (so your agent isn't stuck with a knowledge cutoff), you can install the Google plugin:
openclaw plugins install google
You will need to configure a Google Custom Search API key in your .env file, but once enabled, you can simply ask the bot: "Search for the latest OpenClaw release," and it will browse the web for you.
Troubleshooting Common Issues
If things aren't working smoothly, check these common culprits:
- Container keeps restarting: Usually an invalid API key. Check your logs (
docker compose logs) for401 Unauthorized. - No response in chat: Check the
POLLING_INTERVALin your.env. If it's too high, the bot might seem asleep. Also verify you pasted the correct Telegram Bot Token. - Memory Usage: If the bot crashes randomly, it's almost certainly an OOM (Out Of Memory) error. Check
dmesgor upgrade your VPS RAM.
Conclusion
You now have a private AI assistant that lives in your pocket but runs on your own infrastructure. No monthly subscription fees to a SaaS provider, no data mining, and complete control over the "brain" you plug into it.
I'm personally migrating my production instance to Hetzner (8GB) to solve the latency issues, but the 4GB setup described here is a perfect starting point to dip your toes into self-hosted AI.
Call to Action: Check out the OpenClaw GitHub Repository to contribute or star the project.
Appendix: Installation Scripts
Option A: Bare Metal Setup
Save this as setup.sh, make it executable (chmod +x setup.sh), and run it.
#!/bin/bash
set -e

# OpenClaw Bare Metal Installer
# Target OS: Ubuntu 22.04+ (DigitalOcean Droplet)
# Goal: Run OpenClaw without Docker to save memory on 1GB instances.

# --- Configuration ---
SWAP_SIZE="2G"
OPENCLAW_USER="openclaw"
OPENCLAW_HOME="/home/$OPENCLAW_USER"
REPO_URL="https://github.com/openclaw/openclaw.git"
INSTALL_DIR="$OPENCLAW_HOME/openclaw"
NODE_MAJOR=22

# --- Helper Functions ---
log() {
    echo -e "\033[1;32m[INFO]\033[0m $1"
}

error() {
    echo -e "\033[1;31m[ERROR]\033[0m $1"
    exit 1
}

# --- Root Check ---
if [[ $EUID -ne 0 ]]; then
   error "This script must be run as root"
fi

# --- 1. System Update & Dependencies ---
log "Updating system packages..."
apt update && apt upgrade -y
apt install -y curl git build-essential python3

# --- 2. Setup Swap (Critical for 1GB RAM) ---
if [ ! -f /var/swap.img ]; then
    log "Creating $SWAP_SIZE swap file..."
    fallocate -l $SWAP_SIZE /var/swap.img
    chmod 600 /var/swap.img
    mkswap /var/swap.img
    swapon /var/swap.img
    echo "/var/swap.img none swap sw 0 0" >> /etc/fstab
    log "Swap file created and enabled."
else
    log "Swap file already exists. Skipping."
fi

# --- 3. Install Node.js ---
if ! command -v node &> /dev/null; then
    log "Installing Node.js $NODE_MAJOR..."
    curl -fsSL https://deb.nodesource.com/setup_${NODE_MAJOR}.x | bash -
    apt install -y nodejs
else
    log "Node.js is already installed: $(node -v)"
fi

# Install pnpm (Required for build)
if ! command -v pnpm &> /dev/null; then
    log "Installing pnpm..."
    npm install -g pnpm
else
    log "pnpm is already installed: $(pnpm -v)"
fi

# --- 4. Create Service User ---
if ! id "$OPENCLAW_USER" &>/dev/null; then
    log "Creating service user: $OPENCLAW_USER"
    useradd -m -s /bin/bash "$OPENCLAW_USER"
else
    log "User $OPENCLAW_USER already exists. Skipping."
fi

# Admin User Setup (Interactive)
read -p "Enter username for the new admin user (e.g. bruce): " ADMIN_USER
if [[ -n "$ADMIN_USER" ]]; then
    if ! id "$ADMIN_USER" &>/dev/null; then
        log "Creating admin user: $ADMIN_USER"
        useradd -m -s /bin/bash "$ADMIN_USER"
        usermod -aG sudo "$ADMIN_USER"
        passwd "$ADMIN_USER"

        # SSH Key Copy
        log "Setting up SSH keys for $ADMIN_USER..."
        mkdir -p "/home/$ADMIN_USER/.ssh"
        if [ -f /root/.ssh/authorized_keys ]; then
            cp /root/.ssh/authorized_keys "/home/$ADMIN_USER/.ssh/"
            chmod 700 "/home/$ADMIN_USER/.ssh"
            chmod 600 "/home/$ADMIN_USER/.ssh/authorized_keys"
            chown -R "$ADMIN_USER:$ADMIN_USER" "/home/$ADMIN_USER/.ssh"
            log "SSH keys copied from root."
        else
            log "Warning: /root/.ssh/authorized_keys not found. You may need to add keys manually."
        fi
    else
        log "Admin user $ADMIN_USER already exists."
    fi
fi

# --- 5. Install OpenClaw ---
if [ ! -d "$INSTALL_DIR" ]; then
    log "Cloning OpenClaw repository..."
    sudo -u "$OPENCLAW_USER" git clone "$REPO_URL" "$INSTALL_DIR"
else
    log "OpenClaw directory already exists. Pulling latest..."
    cd "$INSTALL_DIR"
    sudo -u "$OPENCLAW_USER" git pull
fi

cd "$INSTALL_DIR"

log "Installing dependencies (pnpm install)..."
sudo -u "$OPENCLAW_USER" pnpm install

log "Building project (pnpm run build)..."
# Check if build script exists
if grep -q '"build":' package.json; then
    sudo -u "$OPENCLAW_USER" pnpm run build
else
    log "No build script found. Skipping build step."
fi

# --- 6. Configuration ---
if [ ! -f .env ]; then
    log "Setting up default .env..."
    if [ -f .env.example ]; then
        sudo -u "$OPENCLAW_USER" cp .env.example .env
        log "Copied .env.example to .env. Please edit it later."
    else
        log "No .env.example found. Creating empty .env."
        sudo -u "$OPENCLAW_USER" touch .env
    fi
fi

# --- 7. Systemd Service Setup ---
SERVICE_FILE="/etc/systemd/system/openclaw.service"

log "Creating systemd service at $SERVICE_FILE..."

# Find pnpm path
PNPM_PATH=$(which pnpm)

cat <<EOF > $SERVICE_FILE
[Unit]
Description=OpenClaw Bare Metal Service
After=network.target

[Service]
Type=simple
User=$OPENCLAW_USER
WorkingDirectory=$INSTALL_DIR
Environment=NODE_ENV=production
# Inject Memory Limit to prevent OOM
# For 16GB RAM server, we give it ~12GB heap
Environment=NODE_OPTIONS="--max-old-space-size=12288"
ExecStart=$PNPM_PATH start -- gateway
Restart=always
RestartSec=10

[Install]
WantedBy=multi-user.target
EOF

log "Reloading systemd..."
systemctl daemon-reload
systemctl enable openclaw

# --- 8. CLI Setup ---
log "Creating 'openclaw' CLI alias..."
cat <<EOF > /usr/local/bin/openclaw
#!/bin/bash
# Wrapper to run openclaw CLI as service user
cd $INSTALL_DIR
# Use node directly as pnpm script 'cli' does not exist
sudo -u $OPENCLAW_USER node openclaw.mjs "\$@"
EOF
chmod +x /usr/local/bin/openclaw

log "--- INSTALLATION COMPLETE ---"
log "To start the service, run: sudo systemctl start openclaw"
log "To check logs, run: sudo journalctl -u openclaw -f"
log "To use CLI, run: openclaw --help"
log "-> SCRIPT: Run 'openclaw onboard' to configure models, keys, and channels."
log "-> SCRIPT: To enable Gemini: 'openclaw plugins enable google-gemini-cli-auth'"
log "NOTE: You might need to edit $INSTALL_DIR/.env before starting."
(See full script content in file)
Option B: Docker Setup (Experimental)
If you prefer Docker and have enough RAM, you can use this.
#!/bin/bash
set -e

# --- Configuration ---
SWAP_SIZE="2G"
OPENCLAW_USER="openclaw"
OPENCLAW_HOME="/home/$OPENCLAW_USER"
REPO_URL="https://github.com/openclaw/openclaw.git"
INSTALL_DIR="$OPENCLAW_HOME/openclaw"

# --- Helper Functions ---
log() {
    echo -e "\033[1;32m[INFO]\033[0m $1"
}

error() {
    echo -e "\033[1;31m[ERROR]\033[0m $1"
    exit 1
}

# --- Root Check ---
if [[ $EUID -ne 0 ]]; then
   error "This script must be run as root"
fi

# --- 1. System Update ---
log "Updating system packages..."
apt update && apt upgrade -y

# --- 2. Swap File Setup ---
if [ ! -f /var/swap.img ]; then
    log "Creating $SWAP_SIZE swap file..."
    dd if=/dev/zero of=/var/swap.img bs=1024 count=$((2 * 1024 * 1024))
    mkswap /var/swap.img
    swapon /var/swap.img
    chmod 0600 /var/swap.img
    echo "/var/swap.img none swap sw 0 0" >> /etc/fstab
    log "Swap file created and enabled."
else
    log "Swap file already exists. Skipping."
fi

# --- 3. Docker Installation ---
if ! command -v docker &> /dev/null; then
    log "Installing Docker..."
    apt install -y apt-transport-https ca-certificates curl software-properties-common
    curl -fsSL https://download.docker.com/linux/ubuntu/gpg | gpg --dearmor -o /usr/share/keyrings/docker-archive-keyring.gpg
    echo "deb [arch=$(dpkg --print-architecture) signed-by=/usr/share/keyrings/docker-archive-keyring.gpg] https://download.docker.com/linux/ubuntu $(lsb_release -cs) stable" | tee /etc/apt/sources.list.d/docker.list > /dev/null
    apt update
    apt install -y docker-ce docker-ce-cli containerd.io
    log "Docker installed successfully."
else
    log "Docker is already installed. Skipping."
fi

# --- 4. User Creation ---
# Service User
if ! id "$OPENCLAW_USER" &>/dev/null; then
    log "Creating service user: $OPENCLAW_USER"
    useradd -m -s /bin/bash "$OPENCLAW_USER"
    usermod -aG docker "$OPENCLAW_USER"
else
    log "User $OPENCLAW_USER already exists. Skipping."
fi

# Admin User Setup (Interactive)
read -p "Enter username for the new admin user (e.g. bruce): " ADMIN_USER
if [[ -n "$ADMIN_USER" ]]; then
    if ! id "$ADMIN_USER" &>/dev/null; then
        log "Creating admin user: $ADMIN_USER"
        useradd -m -s /bin/bash "$ADMIN_USER"
        usermod -aG sudo "$ADMIN_USER"
        passwd "$ADMIN_USER"

        # SSH Key Copy
        log "Setting up SSH keys for $ADMIN_USER..."
        mkdir -p "/home/$ADMIN_USER/.ssh"
        if [ -f /root/.ssh/authorized_keys ]; then
            cp /root/.ssh/authorized_keys "/home/$ADMIN_USER/.ssh/"
            chmod 700 "/home/$ADMIN_USER/.ssh"
            chmod 600 "/home/$ADMIN_USER/.ssh/authorized_keys"
            chown -R "$ADMIN_USER:$ADMIN_USER" "/home/$ADMIN_USER/.ssh"
            log "SSH keys copied from root."
        else
            log "Warning: /root/.ssh/authorized_keys not found. You may need to add keys manually."
        fi
    else
        log "Admin user $ADMIN_USER already exists."
    fi
fi

# --- 5. Firewall Confirmation ---
log "--- FIREWALL CONFIGURATION ---"
log "Skipping UFW setup to avoid conflicts with Docker/Cloud Firewall."
echo -e "\033[1;33m[IMPORTANT]\033[0m Please verify your DigitalOcean Cloud Firewall allows inbound traffic on:"
echo "  - Port 22 (SSH)"
echo "  - Port 18789 (OpenClaw Gateway)"

# --- 6. OpenClaw Installation ---
log "Installing OpenClaw..."

# Clone Repo
if [ ! -d "$INSTALL_DIR" ]; then
    log "Cloning OpenClaw repository..."
    # Running as the openclaw user to ensure permissions
    sudo -u "$OPENCLAW_USER" git clone "$REPO_URL" "$INSTALL_DIR"
else
    log "OpenClaw directory already exists."
fi

# Run Docker Setup
log "Running OpenClaw Docker Setup (as $OPENCLAW_USER)..."
cd "$INSTALL_DIR"

# We execute the setup script as the openclaw user
sudo -u "$OPENCLAW_USER" ./docker-setup.sh

# --- 7. Post-Install Instructions ---
log "--- INSTALLATION COMPLETE ---"
echo ""
echo "OpenClaw has been installed to $INSTALL_DIR"
echo ""
echo "To pair your device (DM Pairing):"
echo "1. Send a DM to your bot."
echo "2. Run this command to check for requests:"
echo "   sudo -u $OPENCLAW_USER docker compose -f $INSTALL_DIR/docker-compose.yml run --rm openclaw-cli devices list"
echo "3. Approve the request:"
echo "   sudo -u $OPENCLAW_USER docker compose -f $INSTALL_DIR/docker-compose.yml run --rm openclaw-cli devices approve <REQUEST_ID>"
echo ""